

How to Level Cake Layers Perfectly: A 2026 Guide
Editorial TeamTable of Contents
- Why Level Cake Layers Before Decorating
- Essential Tools for Levelling Cake Layers
- Step-by-Step: How to Level Cake Layers Perfectly
- Preventing Cake Domes: Why Cakes Rise Unevenly
- How to Stack Cakes Without Them Sliding
- Common Levelling Mistakes to Avoid
- Conclusion
- Frequently Asked Questions
Last Updated: September 14, 2026
Why Level Cake Layers Before Decorating
A level cake layer is a sponge with a flat, even top surface, created by trimming away the domed rise that happens during baking. Levelling matters because an uneven layer forces every decoration stacked on top of it to sit at an angle, and no amount of buttercream hides a lean.
At Simply Toppers, we have supplied handmade edible decorations since 2013, and the single most common reason a finished cake looks homemade rather than professional comes down to this one step.
Here is what most guides get wrong: they treat levelling as a cosmetic tidy-up at the end. It is actually structural. A flat top gives your filling an even surface to grip, your stacked tiers a true vertical line, and your toppers a stable base that will not sink on one side.
Below, we walk through the tools, the technique, and the fixes for the problems that trip people up most.
Essential Tools for Levelling Cake Layers
The best cake levelling tools are a long serrated knife, a cake leveller or wire cutter, a turntable, and a small spirit level. You do not need all four. A serrated knife and a steady guide will do the job for most home bakers.
Here is how the options compare:
| Tool | Best For | Skill Needed | Cost |
|---|---|---|---|
| Long serrated knife | Most home bakers | Moderate | Low |
| Adjustable cake leveller | Consistent thickness | Low | Moderate |
| Wire cake cutter | Very soft sponges | Low | Moderate |
| Cake turntable | All methods | Low | Moderate |
A few practical notes. A knife needs to be at least as long as your cake is wide, or you will saw rather than slice. Cake levellers clamp a blade at a set height, which suits bakers producing the same size layer repeatedly. Wire cutters glide through delicate sponges but struggle with dense fruit cakes.
Whatever you choose, chill the cake first. That single habit prevents more torn layers than any gadget.
Step-by-Step: How to Level Cake Layers Perfectly
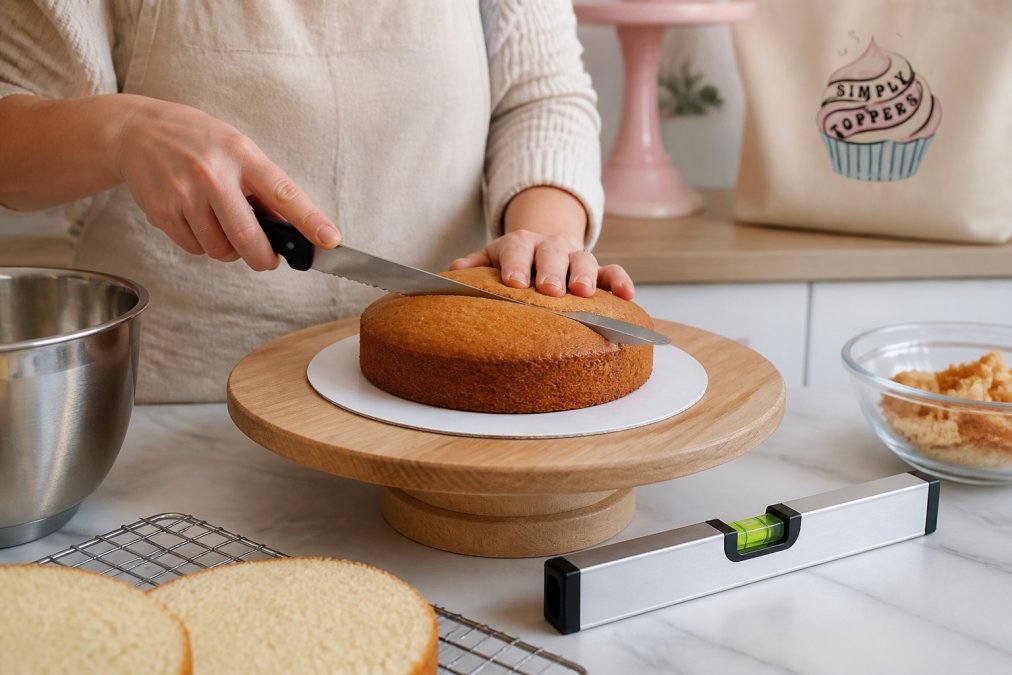
Levelling a cake layer perfectly means chilling the sponge, setting a visible cutting guide at the height you want, and slicing with a gentle sawing motion rather than pressing down. The whole process takes about ten minutes per layer once the cake is cold.
Step 1: Chill Your Cake Layers
Cold cake cuts cleanly. Warm cake tears, crumbles, and drags under the blade.
Wrap each cooled layer in cling film and refrigerate for at least an hour, or freeze for twenty minutes if you are short on time (How to chill, freeze and defrost food safely). A firm sponge holds its shape while the knife passes through, which is the difference between a clean cut and a ragged one.
Expected result: The layer feels firm to a light touch and does not spring back.
Step 2: Set Up Your Levelling Guide
Place the layer on your turntable or board. Decide your target height, usually the depth of the layer at its lowest edge, then mark it.
Simple guides that work:
- Push cocktail sticks into the cake at the target height around the edge
- Rest the blade on a leveller set to that height
- Score a shallow line around the circumference first, then follow it
Scoring before cutting gives your knife a track to follow rather than a decision to make mid-slice.
Step 3: Make the Cut and Check for Evenness
Hold the knife level and use a gentle sawing motion, letting the blade do the work. Turn the turntable as you go rather than moving the knife around the cake.
Once the dome is off, rest your spirit level across the top. Any gap tells you where to shave a little more. Take thin passes rather than one deep cut; you can always remove more, but you cannot put sponge back.
Expected result: A flat top with no visible tilt when you sight along the surface.
Preventing Cake Domes: Why Cakes Rise Unevenly
Cake domes form because the outside edge of the batter sets before the centre does, so the middle keeps rising after the rim has locked in place (How to make cake: top 10 problems fixed). It is a heat distribution problem, not a recipe failure.
You can reduce doming before it happens:
- Use bake-even strips soaked in water and wrapped around the tin (How to bake cake evenly)
- Lower the oven temperature slightly and extend the baking time
- Push batter towards the edges, leaving a shallow dip in the centre
- Avoid over-mixing, which adds air that expands unevenly
- Check your oven is actually at the temperature it claims
Even with all of that, some dome is normal. That is exactly why levelling exists as a step rather than a rescue mission.
If your layers consistently dome hard on one side only, your oven is likely running hot on that side. An oven thermometer will confirm it.
How to Stack Cakes Without Them Sliding
Cakes slide when there is nothing anchoring one layer to the next. A flat, chilled layer plus a proper filling barrier solves almost every case.
Work through this checklist:
- Level every layer before stacking
- Chill each layer thoroughly
- Apply a thin "dam" of stiff buttercream around the edge
- Fill the centre with a softer filling inside the dam
- Press each layer down gently and evenly
- Insert a central dowel or bubble tea straw for tall stacks
- Refrigerate for at least thirty minutes before decorating
The dam is the step most people skip. It stops soft fillings from escaping sideways under the weight above, which is what causes a slow, invisible slide.
For anything over three layers, a central support is not optional. It carries the load so your buttercream does not have to.
Common Levelling Mistakes to Avoid
The biggest levelling mistake is cutting warm cake. Everything else on this list is secondary to that one.
Watch for these:
- Sawing with a short knife. The blade rides up and down, producing a wavy top. Use a blade longer than the cake is wide.
- Pressing down instead of sawing. Pressure compresses the sponge and creates a dense band.
- Cutting too much off. Aim to remove only the dome, not a whole third of the layer.
- Skipping the crumb coat. Loose crumbs from a fresh cut will show through your final icing.
- Levelling after filling. Always level first, then fill. Levelling a filled cake is a mess.
- Ignoring the tilt. If the top is flat but the whole layer leans, your board is not level.
A common mistake is trying to fix a sloped layer with extra buttercream. It never works. The weight simply shifts and the lean returns.
Conclusion
The gap between a cake that looks homemade and one that looks professionally finished usually comes down to a flat, chilled, properly supported layer. Get that right and everything above it behaves.
Once your layers are level, the decoration is the fun part. Simply Toppers makes handmade edible decorations that are 100% vegan, vegetarian, and free from dairy and gluten, so everyone at the table can join in. Our sugar paste toppers are award-winning, including Gold in the Free From Food Awards 2025, and every design is made by hand with over a decade of experience behind it. Whether you need a standard design or something custom-made for a specific celebration, we can help you finish the cake properly.
Get started with Simply Toppers and give your bake the topper it deserves.
Frequently Asked Questions
Should I level my cake while it is warm or cold?
Always chill your cake layers first. A warm cake is fragile and will tear or crumble when you cut it. Wrap the cooled layers in cling film and pop them in the fridge for at least an hour, or overnight. Cold cake holds its shape, so your knife glides through cleanly and you get a flat, even surface. If you are short on time, 30 minutes in the freezer works too.
What is the best tool for levelling cake layers?
A purpose-made cake leveller with an adjustable wire is the easiest option for beginners, as it keeps the blade at a consistent height. A long serrated knife, at least 25cm, works well if you have a steady hand and use a guide. Whichever tool you choose, make sure it is sharp and clean for a neat cut.
How do you keep cake layers from sliding when stacking?
Start with level layers, because a domed top creates a wobbly base. Add a thin layer of buttercream or ganache between each tier to act as glue. Push a central dowel or bubble tea straw through the middle of the stack for stability, especially if you are building more than two layers. Chill the cake for 20 to 30 minutes after stacking so the filling sets before you decorate.
Can you level a cake without a cake leveller?
Yes. Place the cake on a turntable and use a long serrated knife. Rest the blade against a guide, such as a clean ruler or a stack of books at the height you want, and saw gently with a light back-and-forth motion while turning the turntable. The key is to keep the blade level and let the tool do the work.