

Professional Cake Decorating Tips for Beginners
Editorial TeamTable of Contents
- Essential Cake Decorating Tools for Beginners
- How to Pipe Buttercream for Beginners
- Using Edible Cake Toppers for Professional Results
- How to Get a Smooth Finish on Your Cakes
- Common Cake Decorating Mistakes Beginners Make
- Building a Cake Decorating Practice Routine at Home
- Frequently Asked Questions
Last Updated: September 16, 2026
Essential Cake Decorating Tools for Beginners
Professional cake decorating tips for beginners start with one honest truth: you do not need a cupboard full of gadgets. Most home bakers who struggle with neat finishes are fighting their tools, not their talent. At Simply Toppers, we have spent years watching beginners succeed with a short, sensible kit and fail with an overflowing one.
Start here and add slowly:
- Offset palette knife for smoothing buttercream and lifting toppers
- Rotating turntable so you turn the cake, not your wrist
- Piping bags and three nozzles: star, round, and petal
- Spatula and bench scraper for clean sides
- Digital scales for consistent buttercream every time
That list covers the vast majority of beginner projects. For guidance on food safety and allergen labelling when you bake for others, the Food Standards Agency guidance on food allergies and intolerance is the place to check before you share your bakes.
The Tools You Actually Need to Start
A turntable and a palette knife do more for your finish than any expensive mould. Buy those two well and keep everything else basic. Cheap piping bags split mid-bag, which ruins a run of rosettes, so buy a roll and treat them as consumables.
Tools You Can Wait to Buy
Airbrushes, lace moulds, and multi-cavity cutters sit unused in most beginner kitchens. Wait until a specific design demands one. A common mistake is buying a full kit before you know which technique you actually enjoy.
How to Pipe Buttercream for Beginners
The key to piping buttercream for beginners is consistency, not speed. Buttercream that is too stiff cracks at the edges; too soft and it slumps into a puddle. Aim for a texture that holds a soft peak but still spreads without tearing the surface beneath it.
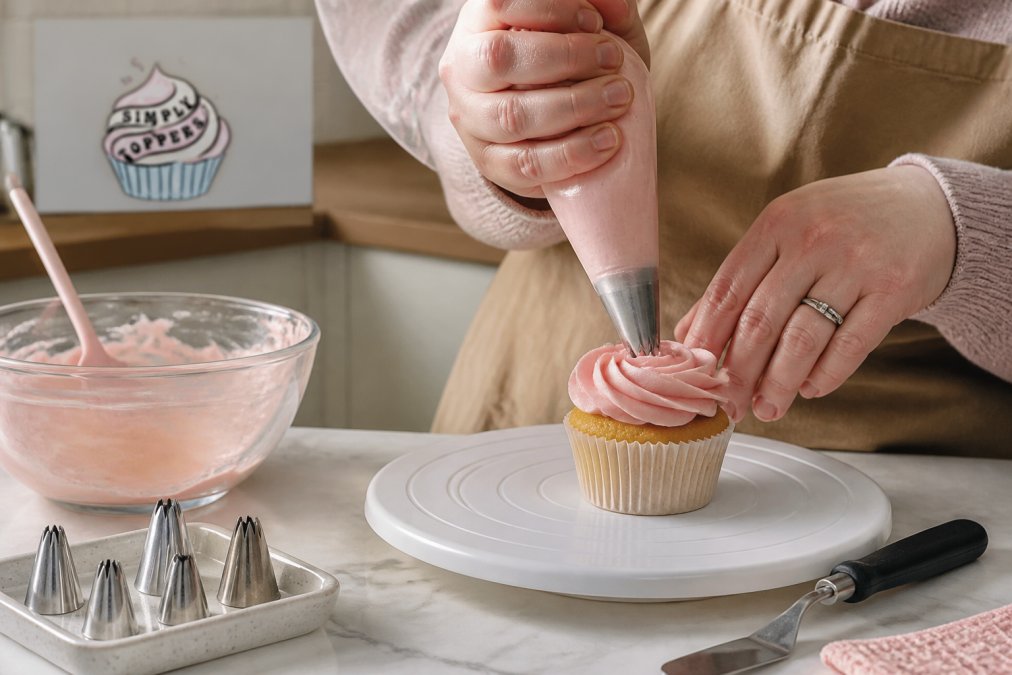
Get there by adding liquid a teaspoon at a time, and stop the moment the mixture turns glossy and smooth. If your kitchen is warm, chill the bowl for five minutes and stir again.
Three techniques to practise first:
- The rosette teaches you even pressure and a clean release
- The shell border builds rhythm and spacing control
- The simple swirl trains you to finish without overworking the icing
Practise each on baking parchment before you touch a real cake. Piping onto paper costs nothing and builds the muscle memory that transfers straight to the cake.
Getting Your Buttercream to the Right Consistency
Test consistency with a spoon, not your eyes. Lift a scoop and let it fall; it should drop in a slow, heavy ribbon that holds its shape for a second or two. If it pours, it is too warm. If it clumps, add a splash of milk or plant-based alternative and beat again.
Three Piping Techniques to Practise First
Spend a week on the rosette, then move to borders. The shell border is the fastest way to make a plain cake look finished, and it hides the join where your cake meets the board.
Using Edible Cake Toppers for Professional Results
Using edible cake toppers is the fastest route from homemade to genuinely impressive. A hand-finished topper gives a plain iced cake a focal point, and it saves the hours you would spend modelling figures by hand. This is where Simply Toppers fits naturally: our handmade sugar paste decorations are 100% edible, suitable for vegans and vegetarians, and free from dairy and gluten, so a single cake can work for a mixed guest list.
Why Handmade Sugar Paste Toppers Are Worth It
Handmade sugar paste toppers carry detail that flat printed sheets cannot match. They sit proud of the surface, catch the light, and taste like actual icing rather than paper. For anyone baking for a guest with coeliac disease or a dairy allergy, an allergen-friendly topper removes one more thing to worry about. Our range has earned recognition including a Gold in the Free From Food Awards 2025, which matters when you are choosing something a child will eat.
How to Get a Smooth Finish on Your Cakes
A smooth finish comes from a cold cake, a warm knife, and patience. Apply a thin crumb coat first, chill it until firm, then add your final layer. Run a hot palette knife under water, dry it, and smooth in short strokes, cleaning the blade every few passes.
| Problem | Likely Cause | The Fix |
|---|---|---|
| Drag marks in icing | Warm knife, soft buttercream | Chill the cake, heat and dry the blade |
| Visible crumbs | No crumb coat | Always apply and chill a base layer |
| Uneven top | Domed sponge | Level the cake before icing |
| Sides bulging | Too much filling | Keep layers thin and even |
Common Cake Decorating Mistakes Beginners Make
The most common mistake is decorating a cake the moment it leaves the oven. Everything else follows from that. Warm cake plus soft buttercream equals sliding layers, and no amount of skill rescues it.
Other frequent errors:
- Overfilling between layers, which causes bulging sides
- Skipping the crumb coat and then wondering where the crumbs came from
- Using the same nozzle for every job instead of matching it to the technique
- Decorating in a hot kitchen with no plan for chilling
Building a Cake Decorating Practice Routine at Home
Progress comes from short, regular sessions rather than one long weekend of baking. Set aside twenty minutes, pipe onto parchment, and bin it afterwards. That repetition is what separates a shaky first rosette from a confident one.
A simple weekly rhythm:
- Monday: ten minutes of rosettes on parchment
- Wednesday: practise one border style
- Weekend: decorate one real cake using a topper to finish it
Frequently Asked Questions
What are the essential tools needed for professional cake decorating?
Start with an offset palette knife, a turntable, a set of piping bags and three nozzles (star, round and petal), a cake scraper and a levelling knife. These cover smoothing, piping and finishing. You can add letter cutters, texture mats and silicone moulds later once you know which styles you enjoy. Many beginners find that a turntable and scraper make the biggest difference to how polished their cakes look.
How do I get a smooth finish on my buttercream cakes?
Chill the crumb-coated cake for at least 30 minutes before applying the final layer. Use a bench scraper held at a slight angle against the side of the cake while turning the turntable slowly. Warm the scraper under hot water and dry it between passes for a cleaner edge. If the buttercream starts to soften, pop the whole cake back in the fridge for 15 minutes and try again.
How can I make my homemade cakes look professional?
Focus on three things: a level top, a smooth base and one well-executed decoration. Trim the dome off your cake before stacking, apply a crumb coat, and choose a single strong focal point rather than crowding the surface. Edible cake toppers give a clean, handmade finish without needing years of piping practice, and they suit birthdays, baby showers and seasonal celebrations equally well.
Are there vegan and gluten-free options for cake decorations?
Yes. Sugar paste toppers made without dairy, gluten or animal-derived ingredients are widely available, and many are suitable for vegans and vegetarians. Always check the packaging for allergen statements, especially if you are baking for someone with coeliac disease or a severe allergy. Our handmade edible decorations are 100% vegan, vegetarian, and free from dairy and gluten, ensuring everyone can enjoy your creations.
How long do edible toppers last once they are on the cake?
Sugar paste toppers hold their shape well for several hours at room temperature and are safe to eat throughout the event. Keep the cake out of direct sunlight and away from radiators, as heat softens the paste. If you need to decorate in advance, store the finished cake in the fridge and bring it out about an hour before serving so the icing returns to room temperature.
What is the best way to practise piping techniques at home?
Pipe onto baking parchment or a silicone mat rather than a real cake, then scrape the buttercream back into the bag and reuse it. Practise one technique per session, such as rosettes or shells, until your pressure and speed feel consistent. Recording short videos of your piping helps you spot uneven pressure. Ten focused minutes a day beats one long session every few weeks.
Do I need to be an experienced baker to use handmade edible toppers?
No. Edible toppers are designed to give a professional finish to any level of bake. Once your cake is covered and smoothed, place the topper gently on the surface or press it lightly into fresh buttercream. They work on shop-bought sponges just as well as homemade ones, which makes them a practical option for busy parents and first-time decorators.
Decorating a cake that looks professional and suits every guest at the table is a genuine challenge, especially when allergies are involved. Simply Toppers makes that part straightforward with handmade, 100% edible decorations that are vegan, vegetarian, and free from dairy and gluten, backed by over a decade of experience and award-winning designs. Browse the range or use the quick order form to find the perfect finish for your next celebration.